github.com/whiteship/live-study/issues/4
4주차 과제: 제어문 · Issue #4 · whiteship/live-study
목표 자바가 제공하는 제어문을 학습하세요. 학습할 것 (필수) 선택문 반복문 과제 (옵션) 과제 0. JUnit 5 학습하세요. 인텔리J, 이클립스, VS Code에서 JUnit 5로 테스트 코드 작성하는 방법에 익숙해
github.com
백기선님이 진행하시는 live-study 4주차 제어문 입니다.
1. 선택문
Switch
// *** ~Java12 ***
int a = 10;

Switch(a){
	case 1:System.out.println("숫자가 1입니다"); break;
    case 2:System.out.println("숫자가 2입니다"); break;
    case 9:System.out.println("숫자가 9입니다"); break;
    case 10:System.out.println("숫자가 10입니다"); break;
{
// result
// 숫자가 10입니다.

Switch(a){
	case 10:System.out.println("숫자가 10입니다");
    case 1:System.out.println("숫자가 1입니다");
    case 2:System.out.println("숫자가 2입니다");
    case 9:System.out.println("숫자가 9입니다");
}
// result
// 숫자가 10입니다.
// 숫자가 1입니다.
// 숫자가 2입니다.
// 숫자가 9입니다.

// *** Java13 ***

int a = 10;
String result = Switch(a){
	case 1: yield "숫자가 1입니다";
    case 2: yield "숫자가 2입니다";
    case 9: yield "숫자가 9입니다";
    case 10: yield "숫자가 10입니다";
    }
System.out.println(result);

//result
// 숫자가 10입니다.
Switch는 기본적으로 조건에 맞는 케이스부터 실행되어 break를 해주지 않으면 해당 케이스부터 하단의 모든 케이스들이 실행된다.
그래서 case 의 끝에는 대부분 break가 붙어있는 코드가 많았다.
Java 12에서는 단순 문자열이나 정수를 리턴할때는 break "hi" 또는 break 3 을 하도록 수정되었는데,
Java 13에 와서 yield라는 키워드가 break를 대신하게 되었다.
Java 12에서의 switch문에 대한 정보
mkyong.com/java/java-12-switch-expressions/
if - else
int a = 10;

String result;

if(a == 1)
	result = "1";
else if(a == 2)
	result = "2";
else if(a > 5)
	result = "5보다 크다";
else if(a == 10)
	result = "10";

System.out.print(result);

// result
// 5보다 크다
if - else는 조건을 만족하는 첫번째 구문만을 실행한다. a가 10일때, a>5와 a == 10 모두 만족하지만, result의 값은 a>5내의 코드만 실행되고 빠져나오게 된다.
2. 반복문
//  *** for문 ***

for(선언문; 조건문; 변수연산){
 //선언문은 for문실행시 최초로
 //조건문은 코드를 실행하기전 조건문에 할당된 조건을 체크하고 true라면 실행, false라면 break
 //변수연산은 코드를 모두 실행한 후 연산된다.
}

for(int i=0; i<5; i++){
	System.out.print(i + " ");
}
//result
// 0 1 2 3 4

// *** for each ***

for(요소를 매핑할 변수 : 배열객체){
	// 배열객체는 어떤 객체이던, primitive타입이던간에 해당 타입으로 이루어진 배열객체가 올수있다.
    // 배열객체의 변수타입으로된 변수는 첫번째 요소부터 끝 요소까지 순서로 매핑될 변수를 의미한다.
}

int[] a = { 0, 1, 2, 3, 4 };

for(int i : a){
	System.out.print(i + " ");
}
//result
// 0 1 2 3 4


// *** while ***
while(조건문){
	// 조건문이 true일때까지 무한정으로 실행되는 루프
}

int a = 0;
while(a < 5){
	System.out.print(i + " ");
    i++;
}
// result
// 0 1 2 3 4


// *** do while ***
do{
	// 가장 첫번째 실행은 조건문이 false여도 실행된다.
    // 하지만 이후는 while과 같은 형태로 동작한다.
}while(조건문)

do{
	System.out.println("한번만 봐줘 ㅠ");
}while(false)
// result
// 한번만 봐줘 ㅠ
3. JUnit5
Java 8이상의 프로젝트 내에서 테스트를 할 수 있는 라이브러리다. 자세한 내용은 밑의 레퍼런스 사이트에서 볼 수 있고 간단하게 정리해서 소개한다.
junit.org/junit5/docs/current/user-guide/
JUnit 5 User Guide
Although the JUnit Jupiter programming model and extension model will not support JUnit 4 features such as Rules and Runners natively, it is not expected that source code maintainers will need to update all of their existing tests, test extensions, and cus
junit.org
위의 User Guide를 통해 최근 공부중인 SpringBoot로 Rest API를 구성했을때의 테스트 케이스를 몇개 작성해 보았다.
TestController 파일
package com.junit.test.controller;

import org.springframework.web.bind.annotation.GetMapping;
import org.springframework.web.bind.annotation.RestController;

@RestController
public class TestController {

    @GetMapping
    public String Hello(){
        return "hello";
    }
}
TestControllerTest 파일
package com.junit.test.controller;

import org.junit.jupiter.api.Test;
import org.springframework.beans.factory.annotation.Autowired;
import org.springframework.boot.test.context.SpringBootTest;

import static org.assertj.core.api.Assertions.assertThat;
import static org.junit.jupiter.api.Assertions.*;

@SpringBootTest
class TestControllerTest {

    @Autowired
    private TestController testController;

    @Test
    void Hello(){
        assertThat(testController.Hello()).isEqualTo("hello"); //단일테스트
    }

    @Test
    void Hello2(){
        String name = "hello";
        assertAll("Heading",// 여러테스트를 한번에
                ()-> assertEquals(testController.Hello(), "hello"),
                ()-> assertEquals(testController.Hello(), name)
        );
    }


}
TestController에서 사용되는 api와 지정해둔 값이 일치하는지 등을 테스트 하는 과정이다.

Intellj 상용버전을 사용하고있는데, 왼쪽의 재생 버튼으로 각 테스트를 버튼 클릭 한번으로 할 수 있다.
버튼을 클릭했을 때 테스트 결과가 정상이라면,
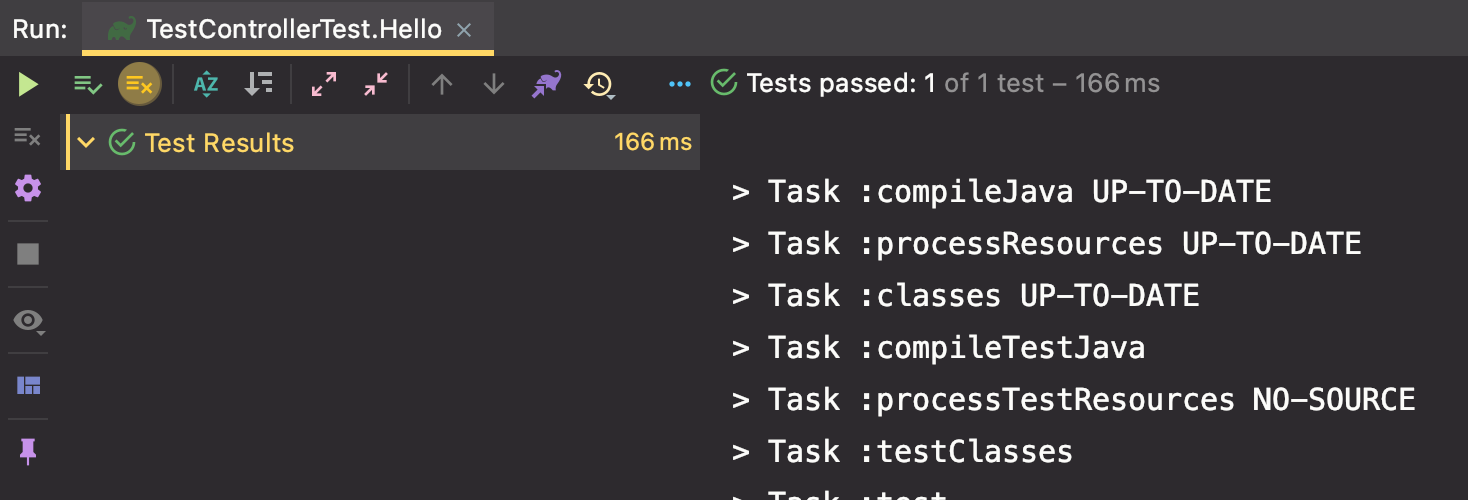
이런식으로 초록색 체크표시로 테스트가 성공되었음을 보여주고, 테스트 결과가 틀렸다면

이런식으로 느낌표 표시와 에러메세지가 출력된다.
그동안 개발코드에서 직접 결과값을 비교하며, 테스트를 진행해왔는데 JUnit을 활용해 좀 더 정형적인 테스트를 도입하면 좋은 효과를 볼 수 있을 것이라고 생각한다.
4. live-study 대쉬보드 코드 작성
github-api.kohsuke.org/dependencies.html
GitHub API for Java – Project Dependencies
Project Dependencies compile The following is a list of compile dependencies for this project. These dependencies are required to compile and run the application: GroupId ArtifactId Version Type Licenses Optional com.fasterxml.jackson.core jackson-databind
github-api.kohsuke.org
가장 먼저 Dependencies 에 들어가 해당 버전의 라이브러리들과 GitHub api도 추가해준다.

저는 일반 Intellj로 일반 자바 프로젝트를 생성하고, File -> Project Properties -> libraries 에서 라이브러리들을 추가해줬습니다
From Maven 을 선택하면 ArtifactId만으로도 편하게 라이브러리를 추가할 수 있습니다.

소스 코드
import org.kohsuke.github.*;

import java.io.IOException;
import java.util.HashMap;
import java.util.List;
import java.util.Map;

import static org.kohsuke.github.GHIssueState.ALL;

public class GitParser {

    public static void main(String[] args){

        try {
            GitHub github = new GitHubBuilder().withOAuthToken("your personal token").build();
            GHRepository repo = github.getRepository("whiteship/live-study");
            List<GHIssue> issues = repo.getIssues(ALL);

            Map<String, Integer> users = new HashMap<>();
            for(GHIssue issue : issues){
                List<GHIssueComment> comments = issue.getComments();
                for(GHIssueComment comment : comments){
                    String username = comment.getUser().getLogin();
                    if(users.containsKey(username)){ // username 키가 있으면
                        users.put(username, users.get(username) + 1);
                    }else{ // 없으면
                        users.put(username, 1);
                    }
                }
                System.out.println(issue.getNumber() + "번 이슈");
            }

            for(String name : users.keySet()){
                System.out.printf("%s %.0f%%%n", name, users.get(name)/18.0*100);
            }
        } catch (IOException e) {
            e.printStackTrace();
        }
    }
}
깃허브 라이브러리를 추가하는것 말고는 라이브러리를 잘 읽어보면 쉽게 작성할 수 있었다.

5. LinkedList 구현
public class LinkedListTest {

    static class ListNode {
        ListNode next;
        int val;

        public ListNode(ListNode next, int val){
            this.next = next;
            this.val = val;
        }

        public ListNode(int val){
            this.next = null;
            this.val = val;
        }

        @Override
        public String toString() {
            return "ListNode{" +
                    "val=" + val +
                    '}';
        }
    }

    public static void main(String[] args) {
        ListNode head = new ListNode(null, 3);

        ListNode node;
        for(int i=1; i<=10; i++){
            node = new ListNode(i);
            System.out.println(add(head, node, i).toString());
        }

        printList(head);

        System.out.println("remove");
        System.out.println(remove(head, 3));

        printList(head);
        node = new ListNode(9);
        if(contains(head, node)){
            System.out.println("포함됨!");
        }
    }

    public static ListNode add(ListNode head, ListNode nodeToAdd, int position) {
        for(int i=1; i<position; i++){
            if(head == null) {
                System.out.println("크기를 벗어났습니다.");
            }
            head = head.next;
        }
        nodeToAdd.next = head.next;
        head.next = nodeToAdd;

        return nodeToAdd;
    }

    public static ListNode remove(ListNode head, int positionToRemove){
        for(int i=0; i<positionToRemove-1; i++){
            if(head == null) {
                System.out.println("크기를 벗어났습니다.");
                return null;
            }
            head = head.next;
        }
        head.next = head.next.next;
        return head.next;
    }

    public static boolean contains(ListNode head, ListNode nodeToCheck){
        while(head != null){
            if(head.val == nodeToCheck.val){
                return true;
            }
            head = head.next;
        }
        return false;
    }

    public static void printList(ListNode head){
        System.out.println("print");
        while(head != null){
            System.out.println(head.toString());
            head = head.next;
        }
    }
}
6. Stack 구현
public class MyStack {

    static int[] stack = new int[1000];
    static int idx;
    public static void main(String[] args){

        for(int i=0; i<10; i++){
            push(i);
        }
        print();

        System.out.println("pop " + pop());
        print();
    }
    static void print(){
        System.out.print("print ");
        for(int i=0; i<idx; i++){
            System.out.print(stack[i] + " ");
        }
        System.out.println();
    }
    static void push(int data){
        stack[idx++] = data;
    }

    static int pop(){
        return stack[--idx];
    }
}
7. ListNode로 Stack 구현

public class MyListNodeStack {

    static class ListNodeStack{
        ListNode top;
    }

    static ListNodeStack stack = new ListNodeStack();
    public static void main(String[] args){

        for(int i=0; i<10; i++){
            push(i);
        }

        print();

        System.out.println("pop " + pop());
        System.out.println("pop " + pop());

        print();

    }

    private static void print(){
        ListNode top = stack.top;
        System.out.print("print ");
        while(top != null){
            System.out.print(top.val + " ");
            top = top.next;
        }
        System.out.println();
    }
    private static void push(int val){
        ListNode node = new ListNode(val);
        node.next = stack.top;
        stack.top = node;
    }

    private static int pop(){
        int result = stack.top.val;
        stack.top = stack.top.next;
        return result;
    }
}
8. Queue 구현
Array Queue
public class MyQueue {

    static class QueueByIntArray {
        int[] que;
        int idx;
        int size;

        public QueueByIntArray(int size) {
            this.size = size;
            this.que = new int[size];
            this.idx = 0;
        }

        public void add(int val) {
            if (this.size == this.idx) {
                System.out.println("사이즈 초과");
                return;
            }

            for (int i = this.idx; i >= 0; i--) {
                this.que[i+ 1] = this.que[i];
            }
            this.que[0] = val;
            this.idx++;
        }

        public int poll() {

            return this.que[--this.idx];
        }

        public void print() {
            System.out.print("print ");
            for (int i = 0; i < this.idx; i++) {
                System.out.print(this.que[i] + " ");
            }
            System.out.println();
        }
    }

    public static void main(String[] args) {
        QueueByIntArray q = new QueueByIntArray(100);

        for (int i = 0; i < 10; i++) {
            q.add(i);
        }

        q.print();

        System.out.println("pop " + q.poll());
        System.out.println("pop " + q.poll());
        q.print();


    }

}
ListNode Queue
public class MyQueueNode {

    static class QueueByNode {
        ListNode head;

        public QueueByNode() {
        }

        private void add(ListNode node) {
            node.next = this.head;
            this.head = node;
        }

        private int poll() {
            ListNode tmp = this.head;
            while(true){
                if(tmp.next.next == null){
                    int result = tmp.next.val;
                    tmp.next = null;
                    return result;
                }
                tmp = tmp.next;
            }
        }

        private void print() {
            System.out.print("print ");
            ListNode node = this.head;
            while (node != null) {
                System.out.print(node.val + " ");
                node = node.next;
            }
            System.out.println();
        }
    }

    public static void main(String[] args) {
        QueueByNode que = new QueueByNode();

        for(int i=0; i<10; i++){
            ListNode tmp = new ListNode(null, i);
            que.add(tmp);
        }

        que.print();

        System.out.println("pop " + que.poll());
        System.out.println("pop " + que.poll());

        que.print();

    }
}
'Java' 카테고리의 다른 글
| [Java] 상속 (0) | 2021.02.21 |
|---|---|
| [Java] 클래스 (0) | 2021.01.04 |
| [Java] 연산자 (0) | 2020.12.20 |
| [Java] 자바 데이터 타입, 변수 그리고 배열 (0) | 2020.12.19 |
| [Java] JVM은 무엇이며 자바 코드는 어떻게 실행하는 것인가. (0) | 2020.12.17 |


